nRF7002 칩 적용 - Raytac AN7002A-nRF5340 개발 보드(AN7002Q-DB-5340) 개발 및 프로그래밍 환경 설정 방
- 2024년 7월 8일
- 2분 분량
Raytac의 AN7002 Wi-Fi 모듈과 nRF5340 모듈을 빠르게 시작할 수 있도록 AN7002Q-nRF5340 데모 보드(AN7002Q-DB-5340)와 nRF5340 DK를 사용하여 개발 및 프로그래밍 환경을 설정하는 방법에 대한 간단한 가이드를 소개합니다.
This article will cover the 4 sections below:
1. Hardware setup
2. Software Development Kit and Environment setup
3. Programming/Development
4. Flashing/Uploading firmware

1. Hardware Setup
1 x Nordic nRF5340-DK: PCA10095(2.0.0)
1 x Raytac AN7002Q-DB-5340
1 x IDC Cable
1 x USB-Micro USB Cable
1 x USB-Type C USB Cable
Note: You need to use both the “Nordic nRF5340-DK” and “Raytac AN7002Q-DB-5340 demo board” together for programming and development.
Steps to connect the hardware:
Connect J-Link on Nordic DK to AN7002Q-DB-5340 using IDC Cable
Power Nordic nRF5340-DK up using Micro USB Cable
Power Raytac AN7002Q-DB-5340 up using Type C USB Cable

AN7002Q-DB-5340 Schematic Diagram:

2. Software Development Kit and Environment Setup
Download nRF Connect For Desktop: Download nRF Connect For Desktop (Please Click Me)
Download nRF Command Line Tools: Download nRF Command Line Tools (Please Click Me)
(1) Download and install the latest version of nRF Connect for Desktop (Windows 64-bit – 5.0.0 version)nrfconnect-setup-5.0.0-x64.exe
(2) Download and install the latest version of nRF Command Line Tools (Windows X86 64 – 10.24.2 version)
nrf-command-line-tools-10.24.2-x64.exe
Note: During set-up, the SEGGER J-LINK installation/update request might pop up on your screen.
(As shown in below screenshot).

After the installations are completed, you can see the following applications under the:
“Programs and Features” section in the Control Panel.

Step1.
Open “nRF Connect for Desktop” → Choose “Toolchain Manager” → then click” Open”

Step2.
You’ll see a list of nRF Connect SDK versions. It’s recommended to install NCS v2.6.0 or later.Here, we use NCS v2.6.0 as an example.

Step3.
Before installing NCS v2.6.0, confirm the installation path (Default path → C:\ncs).

If you want to change the path, click “Select directory”, and press OK.


Step4.
After installing the nRFConnect SDK v2.6.0, click “Open VS Code”.

Step5.
Open the Wi-Fi scan example


Step6.
Add build configuration → select the board and compile.

Select board: nrf7002dk_nrf5340_cpuapp.


Step7.
After compilation, a hex file will be generated.

Step8.
Under ACTIONS, you can choose to Build, Debug, or Flash.
Build:

Debug:
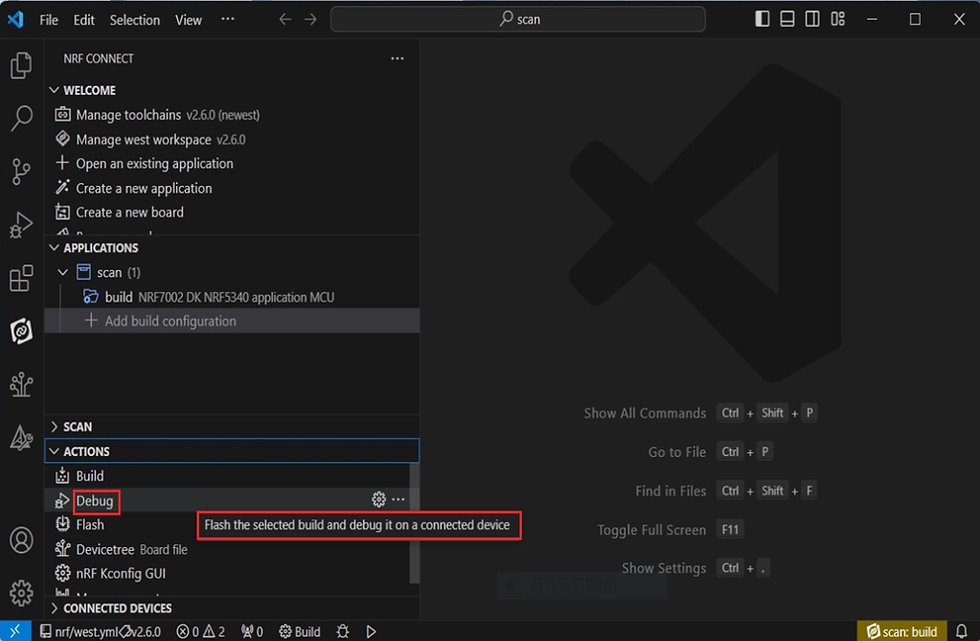
Flash:

4. Programming
nRF Connect SDK(NCS) supports programming. You can use the “Programmer” tool to flash .hex file.Here’s how:
Step1.
Open “nRF Connect for Desktop” → Select “Programmer” → then click” Open”.

Click “Select Device”;

Since AN7002 Wi-Fi IC does not act as an MCU,
we can only flash the .hex file into the MDBT53(nRF5340) BLE IC.

Click “Add file” to add the .hex file.

Step2.
Select the .hex file you want to flash.

The hex file will be written into the part of the memory layout (where orange part is highlighted).

Slashes will be displayed in the circled part during the flash process.

Step3.
Once the flash process is completed, connect Raytac’s AN7002Q-DB-5340 development board to PuTTY.


The flash process is completed when the LOG is displayed as circled below.

Check if hardware connection is successful using PuTTY.

Useful references:
Chinese Laboratory Equipment Shipment
No.1 Solar Energy Solution Company in Pakistan
Solar Cleaning Services in Karachi
Buy Pickles and Sauce, Snacks and pani puri Online
Local SEO and small business SEO Services
Save Any Thumbnail from YouTube Video
Instagram Video and Reels Download Tool
Best Solar Energy Installer in Pakistan
yt1, yt2, yt3, yt4, yt5, yt6, yt7